
Author: Tipsy Batta
Estimated Read Time: 4 minutes
Your car interior might look clean at first glance, but dirt, dust, food crumbs, sweat, bacteria, and grime often hide in places most drivers never check. These overlooked areas can cause bad smells, sticky surfaces, stained materials, and even faster interior wear over time.
The good news is that with the right tools and a careful process, you can refresh these hidden spots and make your car feel cleaner, healthier, and more comfortable.
At Gleamoo, we see this all the time during interior detailing jobs across Sydney. Many vehicles look tidy on the surface, but once we inspect seat rails, cup holders, air vents, door pockets, and boot edges, the real build-up becomes obvious.
Why Hidden Car Interior Areas Get Dirty So Easily
Most car owners focus on the highly visible areas: seats, carpets, dashboard, mats, and windows. However, a vehicle's cabin is full of small gaps, textured surfaces, rails, grooves, and storage spaces where dust and grime collect quietly out of sight.
Because these areas are harder to reach, they are frequently skipped during quick weekend washes. Over time, that build-up traps moisture, holds unpleasant odours, attracts pests, and makes your car cabin age prematurely. To achieve a true, deep clean, it helps to follow a structured process like the one covered in Gleamoo’s Ultimate Interior Detailing Guide.
The 8 Most Overlooked Areas Inside a Car
1. Seat Rails and Under-Seat Areas
Seat rails are one of the absolute dirtiest places inside most vehicles. Coins, chips, hair, sand, dust, and sticky residue consistently collect under the front seats. Because the rails are made of metal and rely on moving parts, built-up grime can also grind down the mechanism and affect how smoothly the seat slides.
-
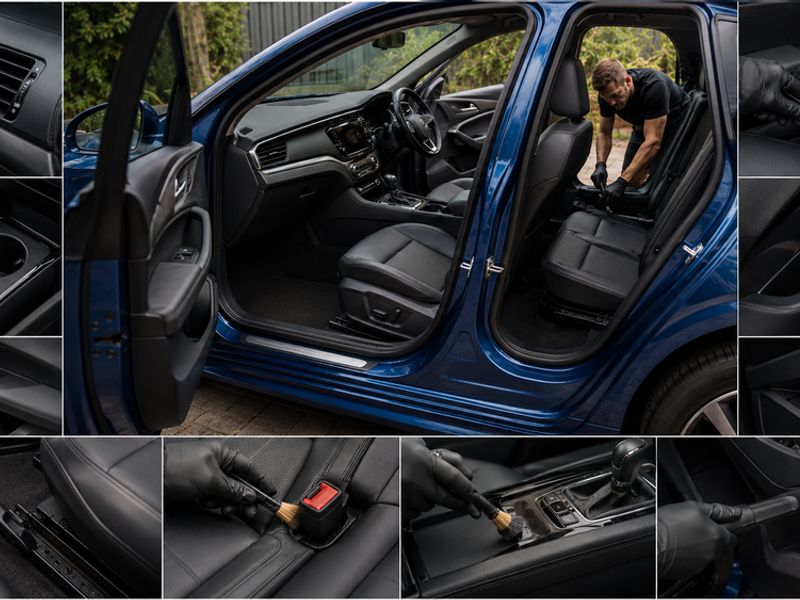
How to clean: Move the seats fully forward and backward to expose the hidden tracks. Use a vacuum crevice tool first, then use a soft detailing brush to loosen stubborn dirt packed around the rails.
2. Air Vents and Grilles
Air conditioning vents constantly collect dust, pollen, and fine particles. When you turn on the fan or A/C, that accumulated dust blows straight into the cabin air you breathe. In Sydney, we often see extra build-up from dry weather, roadside dust, and cars parked near active construction areas.
-
How to clean: Use a dry, soft vent brush or a dedicated detailing brush to sweep out the slats. Avoid soaking the vents with liquid cleaner, as moisture can easily travel behind the dashboard into electrical components.
3. Centre Console Cup Holders
Cup holders are small but act as magnets for sticky residue. Coffee spills, soft drink condensation, melted chocolate, and rogue crumbs create sticky rings that trap more airborne dirt over time.
-
How to clean: Remove any rubber inserts if your car has them. Wash those separately in warm soapy water, then clean the main cup holder body with a mild interior cleaner and a microfiber cloth.
4. Door Pockets and Inner Door Handles
Door pockets often accumulate old receipts, bottles, tissues, wrappers, and heavy dust. Meanwhile, inner door handles and window switches collect oils from your hands, sunscreen, food residue, and daily grime.
-
How to clean: These areas require more than a fast wipe. Use an interior-safe detailing brush to reach into the tight seams and corners of the door pockets, then wipe the surface clean with a microfiber towel.
5. Seat Belt Straps and Buckles
Seat belts are touched every single time you drive, yet they are rarely ever cleaned. Because they rest against your body, they absorb sweat, body oils, sunscreen, food stains, and deep-set odours.
-
How to clean: Pull the belt out fully to its extension limit and clean it gently with a fabric-safe cleaner. Do not over-wet the belt webbings, and always allow them to dry fully before letting them retract.
6. Steering Wheel, Gear Selector, and Stalks
These are the highest-touch areas in your entire car. Even if they look clean, they are usually coated in microscopic oils, bacteria, and dead skin cells. Leather-wrapped steering wheels need extra care, as harsh household chemicals can cause the leather to dry out, crack, or peel.
-
How to clean: Apply an interior-safe automotive cleaner to a microfiber cloth and wipe gently. For textured areas, seams, and indicator stalks, use a soft-bristled brush lightly and avoid aggressive scrubbing.
7. Boot Edges and Spare Wheel Well
The boot is often forgotten unless a major spill or smell forces you to look closer. Dust, sand, pet hair, shopping residue, and moisture collect quietly around the boot rubber seals and underneath the boot floor panel.
-
How to clean: Empty the boot entirely, including the spare wheel compartment. This is especially vital if you regularly transport sports gear, prams, tools, or beach items. For an all-inclusive restoration, Gleamoo’s Full Car Detailing Guide explains how a complete interior and exterior detail restores the entire vehicle beyond just the visible surfaces.
8. Interior Glass Edges and Rear-View Mirror
Most people clean the center of the windscreen but miss the very top and side edges. These perimeter areas collect oily fingerprints, a hazy plastic-gas residue, dust, and overspray from dashboard dressings.
-
How to clean: Spray a premium automotive glass cleaner onto a microfiber towel, wind down windows slightly to clean the very top edge, and use a second dry microfiber cloth to buff away any remaining streaks.
DIY Guide: How to Clean Overlooked Car Interior Areas
Tools and Cleaning Materials Needed
-
Vacuum cleaner with a narrow crevice attachment
-
Soft-bristled detailing brushes
-
Premium microfiber cloths (at least 3 or 4)
-
Interior-safe multi-surface cleaner
-
Automotive-grade glass cleaner
-
Fabric-safe upholstery cleaner (for seat belts)
-
A small bucket of clean water
-
Cotton swabs for ultra-tight corners
-
Optional: Compressed air or a handheld air blower
Estimated Project Time
A proper DIY clean of these overlooked interior areas usually takes 45 to 90 minutes, depending on the baseline condition of the car and how meticulous you want to be.
Step-by-Step Cleaning Process
-
Remove loose items first: Empty the cup holders, door pockets, centre console, glovebox, and boot area entirely. This gives you clear, uninhibited access to hidden dirt.
-
Vacuum from top to bottom: Start around the dashboard, vents, seats, and console, then move downward to the carpets, under-seat floor areas, and the rear boot. Use the crevice tool for tight spaces.
-
Brush tight gaps before wiping: Agitate a dry, soft detailing brush around vents, buttons, seams, seat rails, cup holders, and door handles. This loosens stubborn dust that a standard cloth simply cannot reach.
-
Clean high-touch areas carefully: Wipe the steering wheel, gear selector, door handles, window switches, seat belt buckles, and centre console with an interior-safe cleaner.
-
Treat seat belts gently: Pull the belt out fully, clean it with a fabric-safe product, and wipe down the length with a damp microfiber cloth. Let it air dry completely before allowing it to retract back into the pillar.
-
Clean cup holders and storage pockets: Remove rubber inserts if possible. Clean out sticky residue with a microfiber cloth and a mild cleaner. Use cotton swabs to extract grime from tight inner corners.
-
Finish with glass and mirrors: Clean your interior windows, rear-view mirror, and glass edges last. This steps ensures you remove any stray dust or cleaner overspray generated from the earlier steps.
-
Let the interior air out: Leave your car doors or windows open for a few minutes in a secure area. This helps any remaining moisture evaporate completely and prevents trapped odours.
Pro-Tips from Professional Car Detailers
Pro-Tip 1: Focus on the Primary Touch Points First
As professional detailers, we always pay special attention to physical touch points. The steering wheel, gear selector, door handles, window switches, seat belts, and centre console carry the highest volume of body oils and grime. If you only have 15 minutes for a quick refresh, focus on these areas first. It makes the single biggest difference in how clean and hygienic the car feels to drive.
Pro-Tip 2: Never Spray Liquids Directly Onto Electronics
Never spray a liquid cleaner directly onto buttons, screens, vents, or switches. Instead, spray the cleaner onto your microfiber cloth first, then wipe the surface. This simple step eliminates the risk of liquid running behind panels and short-circuiting electrical components.
Why a Professional Deep Interior Detail May Be Worth It
DIY cleaning is an excellent habit for regular weekly maintenance. However, if your car suffers from lingering bad smells, heavy upholstery stains, embedded pet hair, beach sand, food spills, or years of built-up grime in hard-to-reach tracks, a professional interior detail can save hours of labor and deliver a dramatically deeper, sanitised result.
Gleamoo’s professional approach is engineered to clean far beyond the surface level. If you are preparing your vehicle for resale, these overlooked areas matter immensely because prospective buyers notice cleanliness and hidden grime very quickly. You can also read our Pre-Sale Detail Guide for expert tips on presenting your car at its absolute best.
For Sydney drivers who want to keep the entire vehicle looking immaculate, it also helps to maintain the exterior paintwork properly. Our dedicated guides on hand car washing, waterless washing, and how often to wash your car can help you build a highly effective, simple routine.
Professional Assistance & Next Steps
If you are short on time, uncomfortable cleaning delicate interior electronics, or your car's interior requires a deep, comprehensive sanitisation, the team at Gleamoo is ready to assist. For deep-cleaning hidden areas, our most popular option is our comprehensive mobile detailing package, because it targets the deep interior cracks and exterior spaces that standard car washes miss.
You can book Gleamoo’s professional service directly online:
If your vehicle only requires a regular exterior wash as part of your ongoing maintenance routine, you can also explore:
At Gleamoo, we make premium mobile car care convenient, professional, and incredibly easy to book. You can learn more about our commitment to quality and who we are on our About Us page.
Frequently Asked Questions
How often should I clean the hidden areas inside my car?
For most daily drivers, cleaning these hidden areas once every 4 to 6 weeks is an ideal routine. However, if you have children or pets, regularly eat inside the vehicle, or visit the beach often, you will likely need to clean these spaces every 2 weeks to prevent heavy grime and odour build-up.
Can dirty air vents cause bad smells inside the cabin?
Yes, dirty air vents are a primary cause of musty cabin odours. Dust, pollen, airborne moisture, and trapped organic particles inside or around the vent grilles can grow mould and bacteria over time. While cleaning the outer vent surfaces helps, strong or persistent odours may require a deeper interior steam clean or a replacement of your car's cabin air filter.
Is it safe to clean seat belts myself?
Yes, it is perfectly safe to clean seat belts yourself as long as you use a gentle approach. Use a mild, fabric-safe upholstery cleaner, avoid soaking the belt entirely, and always let it air dry completely before allowing it to retract. Never use harsh chemicals, chlorine bleach, or aggressive wire scrubbing brushes, as these can weaken the structural integrity of the seat belt webbing fabric.
About the Author
Tipsy Batta from Team Gleamoo is passionate about helping Australian car owners keep their vehicles clean, protected, and highly enjoyable to drive. With a strong focus on practical car care, professional detailing standards, and customer-focused advice, Tipsy shares simple, actionable tips that make everyday vehicle maintenance both easier and far more effective.